crusader_x's
Master Customizing Guide


Introduction:
By calling this The Master Customizing Guide, I am by no means calling myself a master, nor am I claiming this guide will make you a master at customizing. However, it is my intention to make a guide that covers the basics of customizing as well as tools and resources involved. I will be constantly adding and updating information so feel free to email me your knowledge or opinions, or if you just have a question.


History:
06/30/08 - Guide created.

Table of Contents / Quick Jump Menu:
Painting
- Paints
- Spray Paints
- Paint Pens

Brushes

Glues

Safety
- Protection
- Eyewear
Tools
- Drivers
- Pliers
- Clips & Clamps
- Dremel

Cutting
Sanding
Sculpting & Carving
Measuring & Edges
Cleaning
Dishes
Fans
Decals
Misc.

Paints


The first question we'll answer is: Enamels or Acrylics?
Enamels are oil-based while acrylics are water based. This makes acrylics easier to clean up and dilute for thin coats or use in an airbrush. Acrylics dry faster and thinner, while enamels take longer to dry but are more durable. Enamels are sometimes more glossy than acrylics can be. You need to prime the figure for enamels but not for acrylics. And so on.
So mostly it comes down to a matter of cost or personal taste. I used enamels exclusively for years doing model building. But when it comes to customizing action figures, I've found acrylics are the better choice. The beginner will probably want to start with acrylics and try enamels later when they're comfortable in their skill. Either way, pick one and stick to it for each project. Oil and water doesn't mix. Neither do enamels and acrylics.

The next thing everyone wants to know is: What's the best line of paint to use?
The short answer is Testors Model Master Acryl.
The long answer is Testors Model Master Acryl (A) adheres to almost all surfaces better than any other paint I've tried so far. The Model Master line has a lot of great colors to it. However, the biggest drawback I've found is that some of the military colors are German, and therefore, have German names. This can be a pain if you're looking to order these paints online and don't have a color chart, you'll be wondering "What the heck is Panzer Schokladnbraun?" If there aren't enough military colors for you there is another line called Model Master Marine Acrylics. And Model Master also comes in a Fantasy line that seems to be competing with the color line for Games Workshop Citadel and Vallejo Game Colors. Testors also makes a line of regular Acryls (B). A 1/2 oz bottle of Model Master goes for $3.29 on Testors site, but I find them at a local hobby store for $3.
Testors Paints Online

But speaking of Games Workshop Citadel acrylics (C), they are a great line of fantasy theme colors. They work decently enough as a basecoat, but work better painted or drybrushed over Model Master. In the future I may start moving away from Citadel in favor of Model Master's Fantasy colors. However, the metallics that Citadel has such as Boltgun Metal, Chainmail, and especially Mithril Silver are quite nice. I buy these at a local comic store for $3 for a .4 oz bottle, while the metallics go for $3.50.
Games Workshop Citadel Paints Online

Next up is Tamiya Acrylic Paint (D). Of the paints mentioned so far, I have had the least amount of success with Tamiya. They're not a bad line of paint, but they dry a bit too fast (sometimes right in the bottle after a couple minutes) and do not thin well with water. They do work well enough when dryrbrushed over another paint, are relatively cheaper, and the choices of metallic are very good (I use Chrome Silver quite a bit). But the main reason to use Tamiya is their choice of clear colors. In the above photo, (E) shows you a large bottle of Tamiya which I buy locally for $3.25 while (F) shows you a standard bottle while I buy for $2.
Tamiya Paint Online

Spray Paints


Before I go into spray paints, I threw a bottle of Testors Brush Cleaner (A) in the pic. This is essential for cleaning enamel paints out of your brush. And speaking of which...
Testors Spray Enamel (B) comes in 3 oz cans and several flat or gloss colors. These can be great for model parts, or bases, but don't work as well on plastic figures, especially if the surface hasn't been primed. Instead, the very best spray paint for plastic is Krylon Fusion (C) and is no secret to customizers. Many people swear by this stuff as it bonds extremely well to plastic. Most automotive spray paints have generally mixed results when sprayed on plastic, but fusion is made just for plastic. The Fusion line also comes in nice metallic shades, some of which give you a "hammered metal" look.

For great texture on bases I use Plasti-kote Stone Touch Spray (D). There are several different types, each with different textures that you can use on a base to create rocky terrain, gravel, pavement, etc. Once you lay down a coat of Stone Touch, building the texture to the desired level, you can then hit it with a layer of Krylon or other paint.
And finally, Plaid Clear Acrylic Sealer (E) comes in Glass or Matte (flat) and is what I use to seal my customs. This helps hold in paint and decals and protects against paint-rub. Krylon also makes clear sealer that I have heard works well.
Krylon Paints Online

Paint Pens


Sometimes paint pens can be a great shortcut in detailing your custom or model. Sharpie makes a Metallic Silver Marker (A) that is an ink but shows up well on acrylic paint. These markers must be stored tip down so that the metal flakes inside stay at the tip, making the marker always ready-to-use. Another option is the paint pens by Elmer or Krylon (B) that are easily found at Wal-Mart or Michaels. The problem is, they are almost always oil-based and broad-tipped, making them unweilding for small details and difficult to use across large areas that have already been painted with acrylics. However, they do have their uses if you're inventive.
Regular Sharpies or ink markers (C) are not ideal for customs as they do not normally stick well to paint, can cause discoloration, and rub off too easily. But I keep some around, especially the double-ended Sharpie, for marking off measurements on wood, plastic, and other parts I need to cut. Keep one of these on your desk.

Another option is the DecoColor paint pens (D) found at Michaels. They are oil-based and rather glossy, but come in Fine and Extra Fine tips that I have used for panel lines. You can also use them to touch up slight paint-rub or edges.


The above image shows you the difference in pen tips. (A) is a standard Sharpie Fine tip, while (B) is Ultra Fine. The DecoColor pens come in Fine (C) and Extra Fine (D).

Brushes


Brushes are as important as the paint you use, as a good brush can mean great detail... whereas a bad brush means great frustration. There are many different kinds and sizes of brushes out there, and most people have their favorites. I myself tend to use White Nylon. I have tried natural brushes such as Camel Hair, but haven't had much luck.

You need fine brushes for detailing (A). Spending good money on these is wise, as you'll definately want quality when it comes to small details. You'll also want some medium size brushes (B) as well as bigger, broader brushes (C) for covering large areas. Inevitably, you're going to drybrush, which really wears on a brush, so I pick a few of different shapes and designate them for this task (D). Buying each brush seperately can be expensive, as they can run $3-$8 a piece! So once you buy your fine detail brush, look for the packs of brushes that contain different sizes to cut some cost. The pink brushes in the above image all came in one pack from Michaels for $4. That's $1 a piece, but if I had picked each seperately, they would have $3 a piece. Since you're going to "ruin" a few with drybrushing, save yourself some $$ and buy in packs.
The rounded Camel Hair brush (E) above can be useful for brushing on washes, pastel dust, and so on. However, once you use a brush for something other than paint, keep it that way. The cheapo black bristle brushes (F) you get with paint packs are good for brushing on watered-down glue, and other techniques that are likely to destroy a brush.

Glues


Glues are another important topic, as you'll want to make sure what you're bonding doesn't break easily or down-right fall apart on first use. Choosing a glue can be daughnting, as there are many brands and types. For general bonding, Loctite makes the best Super Glues (A). The one in the image is Control Gel, which is thicker than regular super glue so it doesn't run everywhere. It's the glue I use for most everything. Loctite also makes Ultra Gel, Brush On Super Glue, Glue Pens, etc. All of these have their advantages, so eventually you'll want to give them a try.

Another Loctite product is Sumo Glue (B). However, this glue is not as strong when it comes to plastics, is difficult to apply to small areas, and worst of all it expands. That means that as it dries it spreads out. Not a good idea for figures, but I do use it for bases and other projects. Gorilla Glue (C) also has this problem, but to a greater degree. It expands quite a bit, but that can be useful as a "filler" on bases or in props.
Model Cement (D) is mainly only good for gluing models that aren't likely to be handled. However, there is one problem most super glue has that model cement does not. Super glue tends to leave a film or residue on certain types of plastic, but most especially on clear plastic. This is one area where you'll want to use model cement. Even better is a product Testors makes called Model Master Clear Cement.

Many people use 2-part epoxy (E) for their customs, but I mainly use them for when I need a really strong bond on large pieces. And finally there's always the trustly glue gun (F). Not entirely useful for customs, but good for general bonds such on bases or props. Glue guns best use is in the wicked effects you can create with the molten glue, which will be detailed in the Tips & Tricks section or in seperate Tutorials.

Safety Protection


Safety is paramount and should not be taken lightly. In customizing we're working with a lot of sharp objects and toxic chemicals so we need to take precautions. Dust masks (A) should be worn when you're kicking up particles, such as during sanding. You may not think about it, but when you cut into something or file it or sand it you're throwing pieces of that material into the air and into your lungs. Especially when you're taking off layers that may have dried glue or sculpting compound in them, that stuff is not intended to be breathed. An important difference between protecting against particles and protecting against vapors should be noted. Dust masks are not going to protect against the vapor from glue or paint, you will need a mask with air filters that are rated against Organic Vapors. You can find these masks at Hardware Stores. Check the packaging to make sure it protects against paint vapors, insecticides, etc. Pictures of the mask and filters are coming...

Latex gloves (B) are another useful set of protective gear. I use these to hold parts up while I spray paint them, as you can tell from the photo. Also good for picking things up with a gloss surface that might get fingerprints on it. Another option is the rubber cleaning gloves (C) you might use to wash the dishes with. They tend to be a bit thicker and usually have textured fingers to make it easier to grip with.

Safety Eyewear


No topic on safety is complete without discussing eyewear. You only get one pair of eyes so take care of them. Cutting, sanding, drilling, etc all kick up particles at your face for which you need protection. I never EVER cut or sand or drill without wearing my safety glasses. This is the reason I've never been taken to the ER to have stuff flushed out of my eyeballs. Some of you may scoff at wearing glasses while working, but consider it an unbreakable rule: Always wear eye protection! If you're concerned about comfort, I find the safety glasses (A) are easier to wear than the goggles (B). The glasses I got for $1 at the dollar store while the goggles were $3 at Wal-Mart.

Drivers


You're probably going to be taking apart figures or props to modify or paint them. Larger screwdrivers such as the ones in (A) are good to have around, as they can help in prying things apart. Even better is the multi-headed driver in (B). But most figures have small screws that require precision drivers such as the ones in (C). I even use an eyeglasses repair tool (D) for its small screwdriver heads. And in some rare circumstances, having some Hex Keys/Allen Wrenches (E) can be useful.

Pliers


Pliers (A) are especially useful for customizing, as you'll need to rip things apart or simply hold them while cutting or painting. Even more useful are Needlenose Pliers (B). This pair has cutting blades in the middle which are used for stripping wires or snapping paper clips. Another item in your bag should be Tweezers (C) for dipping decals in water, grabbing small pieces that fall in cracks, and other circumstances. Just be aware that you're liable to get paint or glue on them so make sure you've got a pair just for customizing and save your better pair for your wife's beauty kit.

Clips & Clamps


Testors and other hobby suppliers will try to sell you special clamps for holding parts to paint or squeezing parts together while the glue dries between them. The cheaper alternative is to simply get some Bag Clips (A) at the dollar store, or some Clothespins (B). Both work great at holding things in place while you paint around them.

Dremel


Behold, the Dremel! This is the quintessential tool for customizing, and nearly every guide you read about customizer's tools will include it. It makes your life easier and does work you just can't do by hand. The Dremel pictured is a Dremel Stylus (A) which Jin Saotome wrote a good review for:
Jin's Dremel Stylus Review

I got mine at Wal-Mart because it was on clearance. You can find them at retail or hardware stores for around $60-$70 and it includes a nice set of basic tools to get you customizing. However, one set you will want very soon is the Drill Bits (B) which runs around $6-$8. Wal-Mart and Target both have some Dremels and attachments, but mostly you'll want to go to Lowes or Home Depot for the harder-to-find bits. Dremel also sells kits for specific tasks such as cutting or sanding, like the kit pictured (C). These kits can be found cheaper at Wal-Mart and include a good set of bits you're likely to wear out like grinding bits, sanding disks, etc.

While I love the Stylus, there are other Dremels out there and you should consider your needs before you buy. The Stylus is cordless, and there are other cordless versions, but if you get one with a cord that makes it a bit cheaper. Also, the Stylus can use nearly all other Dremel bits, but cannot use the router attachment. This is a function you may want in your Dremel if you're going to use it for home improvement, so it's something to consider before buying. My suggestion is to shop around, look online, find a model you like and see if you can find it on ebay for a reasonable price. Be aware when buying used because you never know what kind of condition the motor, battery, charger, or bits are in.

This section will be further expanded as I buy and test new bits and attachments.

Cutting


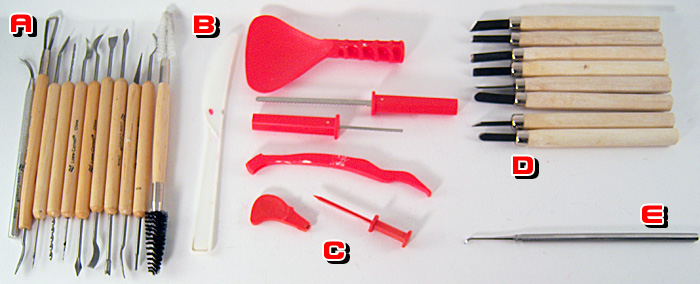
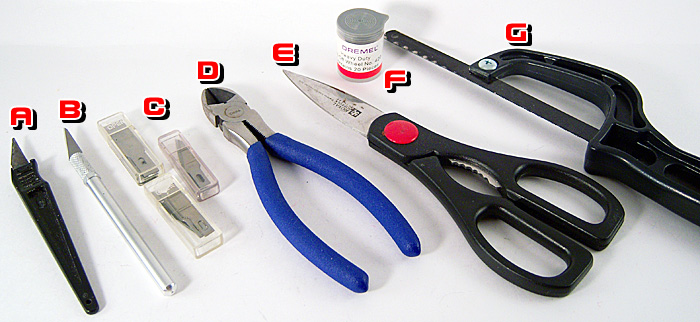
In customizing, we're going to do a great deal of cutting, so we need to have the right tools. Your primary weapon is going to be the Exacto Knife. The one pictured in (A) has the blade built into the handle, giving it greater strength and control. However, blades dull so the one you'll want to get is (B) which can be found at Wal-Mart, Michaels, or hobby stores and usually come with replacement blades (C), or you can buy sets of blades for different tasks. The blades are held in place with teeth that tighten with a twist at the top of the handle, making changing blades pretty easy.

Our next cutting tool is the trust Snips (D). These are the general kind you might find at Lowes or in the hardware aisle at Wal-Mart. A more delicate, precise kind for snipping model parts off of trees can be bought from Testors or a hobby store, but are usually more expensive. These are good for stripping wires, cutting paper clips, or trimming off hard plastic pieces. And basically, if you're using these, you should be wearing eye protection.

Basic utility scissors (E) are also nice to have in our toolbox. Most kinds come with a handy gripping edge in the middle for opening bottles, but has other good uses.

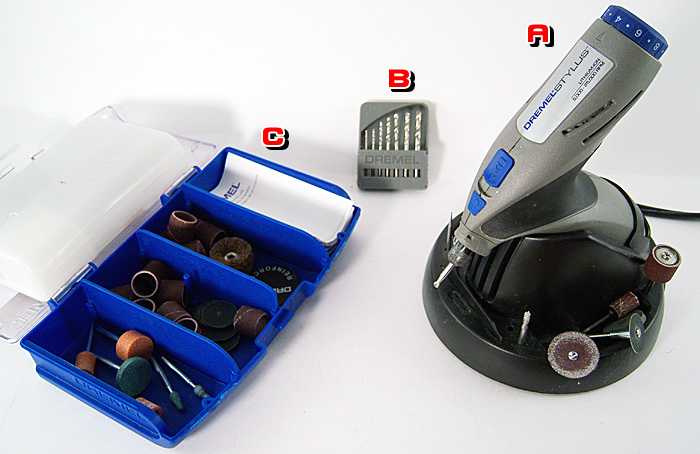
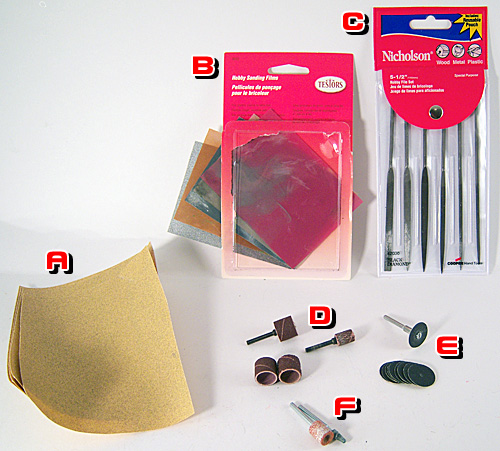
One of the best attachments you'll find for your Dremel are cut-off disks (F). These come in different types for cutting either metal, wood, or plastic. Generally, whatever is suited for wood will work for plastic. These are relatively inexpensive considering the many uses they have. I probably use these for 75% of the cutting I do and they last a long time.

Finally, when you need to cut something dense, big, or thick consider a hack saw (G) or hobby razor saw. The teeth on a hobby razor saw are finer for cutting plastics, whereas a hack saw is likely to gash plastic. But it's useful for cutting wood or metal.

Sanding


Smoothing out surfaces since the beginning of, well, things smoothing out surfaces is Sand Paper (A). You can find this is many different grits. The lower the number, the rougher the surface of the paper. For most plastics we need to use a fine or extra fine grit unless you want some nice scratches on your figure. So start somewhere in the 800 to 1000 grit range. Sometimes, the best sanding paper to be had is in the automotive section, specifically where the touch-up paints are. I use 800, 1000, and 2000 grit for everything from smoothing plastic to evening out paint jobs. Testors makes Hobby Sanding Film (B) with these applications in mind, and it can be found relatively cheap in hobby stores.

Sometimes you're going to need to get rid of plastic burs, round edges, or widen gaps and sand paper won't cut it. So we need some Hobby Files (C) which come in different shapes and are fine enough for plastics. This set was one of the more expensive ones, $16 at Lowes. However, I have seen other sets at Ace Hardware for as low as $5.

Not to be outdone, our Dremel gives us some great options for sanding such as Sanding Bands (D) that fit in a drum attachment and Sanding Disks (E) that screw onto the same mandrel the cutting disks use. I probably use the sanding disks more than the drum sanders because the disks are flexible and are available in a finer grit, but I also go through them faster. And finally are the various Grinding Bits (F) that Dremel offers. You can usually get a nice assortment of these in the Sanding/Grinding kits sold at Wal-Mart.

Sculpting & Carving


When we're ready to start sculpting we're going to need some tools. Some people prefer to make their own, to cut costs and to address particular needs. I will cover that in a Tutorial. For myself, I got this set of Sculpting Tools (A) at Michaels for around $15. So far they've done the job, but they're not as durable as they could be and I broke the end of one before I realized I was using too much pressure. If you want to send me your ideas for creating homemade sculpting tools, look for the email address at the top of the guide.

To compliment your sculpting arsenal, you can use some Plastic Utensils (B) such as a knife or fork. These aren't that useful for fine details, but can be great for large projects, or terrain on bases. And if you break them, you won't feel as bad.

I picked up a Pumpkin Carving set (C) after Halloween that was on clearance for 10¢. Not immensely useful for sculpting, but for that price it's definately been worth it.

When working with wood I use Wood Carving tools (D). Michaels has them for $15. Since you're liable to break these or dull the edges, do yourself a favor and find them at the dollar store for, well, $1.

One of the cool items an advanced model maker has in his/her bag is the Scriber (E) which is great at enhancing panel lines. Scribers are usually sharply pointed tools, sometimes with a slight hook like the one in the above image. You basically run this sharp tip across a surface or in an already-made groove to gouge out the plastic. For the customizer, these can be good for bringing out detail and deepening grooves. You can also use them to create your own panel lines, but to do so takes skill, so practice first. A lot. And even then a template or guide is a good idea.

Measuring & Edges


We will use Rulers (A) a lot in customizing, to measure parts and act as an edge for our tools so we get a straight line. However, the rulers pictured are plastic, and not the best idea when you're guiding your exacto knife, so pick up a metal one at Wal-Mart for cheap. Also consider shaped edges like this Protractor (B) as well as the template pictured. They can be used for guiding your scriber or paint pens, or marking off shapes to cut out of styrene. Lastly, I use a Tape Measure (C) for large measurements. But its better use is to carry with you into a Wal-Mart when you need to measure a figure in the store to see if it will fit with the custom project you're working on.

Cleaning


We'll be making a mess in customizing, throwing paint and dust everywhere. I keep a Terrycloth Towel (A) at my desk for basic cleanups or dusting. This one is a car cleaning towel, so it holds a lot of water and has large fibers that get dust out of grooves and cracks. Another extremely helpful little tool for dusting items is Ye Old Toothbrush (B). Chances are, you've got an old toothbrush sitting around so put it to some good use. These are great for getting dust out of deep grooves or for delicate cleaning.
Next are standard Napkins (C). What for? For one of the most important tasks: cleaning your brushes. You will want to have a stack of these nearby to wipe your brush in while painting, because the cleaner you keep your brushes, the longer they last. I don't even buy these either, I eat a lot of fast food and save the handfull of cheapo napkins they give you in your bag. Many customizers also use these when drybrushing.
Not pictured are Newspapers, which is another must-have for your work station. Put these down before painting, sanding, or anything else to catch the paint and dust and cut your cleanup time down. Newspaper is ideal because its very cheap and easy to come by. I'm willing to bet you can get a lot of it for free if you try. And why is it not pictured? Because if you don't know what newspaper looks like, please stop reading this guide and go outside, you need to get out!

Dishes


Water is our best friend, because it cleans the acrylic paints right out of our brush. The Water Dish (A) I use in painting is simply a styrofoam container from KFC that I got macaroni or mashed potatoes in long, long ago. This is probably the cheapest way to go, just be sure to clean the food out before you use it as a water dish. I even cut some rounded notches in mine for my brushes so they can sit on the rim with the bristles in the water, without gravity warping them. For when I need to change brushes quickly and can't stop to clean the one I'm using. And be sure to change your water very regularly when painting, then empty your dish when finished.
Also pictured is a standard Tupperware Dish (B) that you'll want for many other purposes besides painting. I grabbed an old stained dish my wife wanted to throw out and cleaned it. The lasagna stains down bother me, as long as you wash your dish out it should be fine. I use this one for mixing Clayshay and washing parts, as well as a clean water dish for dipping decals. You can also use it for dipping with other chemicals such as Future Floor Polish, just rinse it out after you use it for anything other than water.

Fans


Fans are great for two good reasons: speeding up drying and cooling/moving air. Why do we need to move the air? Well, when we're cutting or sanding, we throw up dust and unless you're working outdoors, you'll want a fan going to keep the air from getting stuffy and hard to breathe. I keep a small Mini Desk Fan (A) on my workbench mostly to speed up drying on figures or props with a large painted surface. The downside to this is that if you're not careful, your fan is going to coat your paint in dust for you. So keep the area you use for drying especially clean. I also have a Tower Fan (B) that's small enough for a desk and pivots at the top and bottom so I can send air in two directions. This is useful for large projects or to keep myself cool when working. Both of these fans can be found at Target or Wal-Mart for $5-$10.

Decals


Decals add a special level of detail you simply can't get from brushing. One option we have are Rub-on Decals (A). These can be found in hobby stores or craft stores and are relatively inexpensive ($3-$5 a sheet). The top set pictured is for Pinecars, and can sometimes be hard to apply to very small or uneven surfaces. Underneath that set are two that are kinda hard to see in the photo, but are more useful. One is striping, which comes in various thickness and colors, and the other is lettering/numbers which also come in colors and fonts. However, these too can be hard to apply to curved or uneven surfaces, so a better alternative is Water-slide Decals (B). These usually come from model kits, but can be found sold seperately on ebay and sometimes in hobby stores.
The general idea is that you cut around the decal, dip the piece in water, and the decal slides off the backer paper and into your project. You can then move the decal around as long as you keep it and the surface damp. There are also products made just for the application of decals, most of them to help the decals fit into grooved or uneven surfaces. However, I have never had a problem using nothing other than water.

You'll even want to save the Scrap Decals (C) you have left over. Sometimes you can find good uses for the letting or numbering left on the sheet.

Another form of decal are simply Stickers (D) that you usually get in Gundam kits and some model kits. These generally do not adhere as well as water-slide decals, but do have the advantage of being reflective. And always save your scraps and leftovers to cut new shapes out of.

And finally, Testors makes Custom Decal Kits (E) so you can design and print your own water-slides. The basic kit includes spray Decal Bonder, 1 white and 1 clear decal sheet, and a little CD with some sample graphics. You can get replacement decal bonder and decal sheets from Testors online, but fortunately I found them at a local hobby shop for around the same price. Printing your own decals is what you want to work toward, but it will take practice and patience. A more indepth guide on this subject is coming...

Miscellaneous


A Burnishing Tool (A) is a useful little item to have when applying stickers, transferring rub-on decals, etc. Mine happens to be the ink cartridge from a ball-point pen. Of course you need to make sure the ink is completely empty before using the pen tip for burnishing.

Testors sells plastic Pipettes (B) that are used like an eyedropper to transfer water or paint between containers. Essential for mixing your own paint and thinning paint. An alternative would be of course an eyedropper, but pipettes are already extremely cheap.

Toothpicks (C) are great for mixing and stirring paint, as well as other uses in customizing and model building. Cheap to buy, easy to find, and one box will likely last a lifetime.

Masking Tape or Painter's Tape (D) is used to, well, mask areas you don't want painted. Wal-Mart sells several different kinds, all of them relatively cheap. Hobby stores usually have smaller, thinner rolls for models, but this is usually more expensive. Another way to mask parts is with Aluminum Foil (E), or a combination of tape and foil.